A little bit about me
My name is Juan Sebastian Callejas Rodriguez, though I usually just go by Juan Callejas. I was born in Colombia, and while I’ve lived in Canada for the past 10 years, I’m currently making the best of a bad situation by taking advantage of the remote work/study opportunities presented by the Covid-19 pandemic and spending a few months back home in Colombia.
I’m a pansexual 3D artist and game developer. I first started learning Blender back in 2014 and soon after was introduced to Unity, which pushed me to learn to program in C#. At the moment, I’m also pursuing a Digital Media degree at York University, which has allowed me to put my skills to use in all sorts of 3D modelling and game development classes and extracurriculars.
Concept, inspiration, and early iteration
I began by creating the initial base model in Blender. Like with the vast majority of my projects, I knew I wanted to make some sort of abstract piece of technology with no discernable purpose, but with a nice hard-surface aesthetic. The majority of my artistic inspiration comes from the art of games such as Doom/Doom Eternal, Wolfenstein II: The New Colossus, Overwatch, RUINER, Titanfall 1 and 2, The Room series, Atomic Heart, Robo Recall, Borderlands 3, and, despite my very mixed feelings, Cyberpunk 2077. Outside of games, I also get a lot of inspiration from some amazing artists including the one and only Simon Stålenhag, Ivan Lavretsov, Manuel (Du)Pong, E wo kaku Peter, Fernando Correa, MACHINƎ, Scribble Imp, Debora Spiro, Sheng Lam, Davison Carvalho, and many more that I’m probably forgetting to mention.
In terms of deciding to make a design to celebrate Pride month, I was already planning on doing a follow-up of last year’s model, but I was also inspired to make multiple variations by artists like Tam Elle (@weirdtakoyaki), Doki (@dokirosi) and Tori Apiradee (@tori_png), who made some incredible designs to celebrate Pride month (all of which had multiple Pride flag variations). I figured that, while I may not be able to turn my designs into beautiful hard enamel pins like the aforementioned artists are doing, I might still be able to do something fun and interesting with the various Pride flags’ colours and celebrate the vast diversity of the LGBTQ+ community.
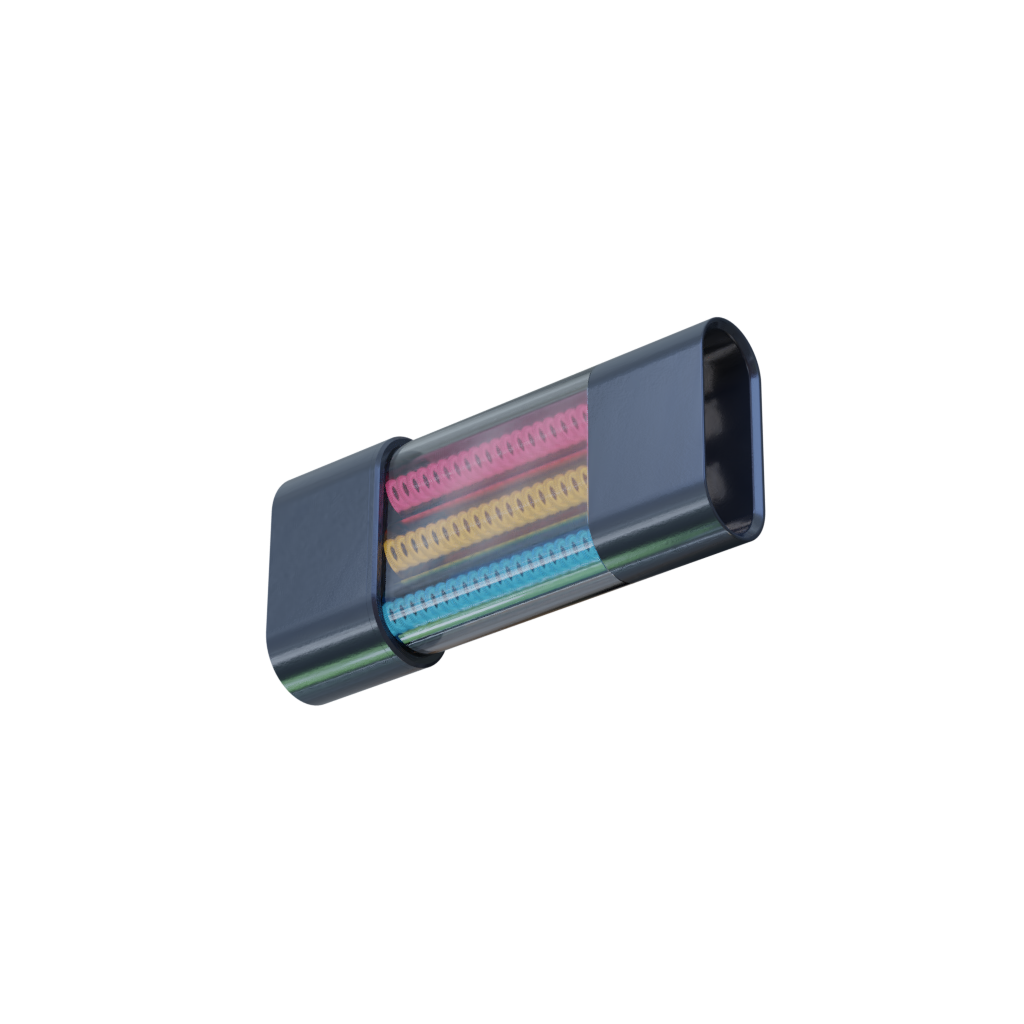
My first idea for this project was to do some sort of “module” that could be inserted into a panel full of other sockets, slots, and modules, with the Pride flag colours being represented by an array of glowing coils running through a glass tube in the middle of the module. I came up with this idea after stumbling upon some neat images of nixie tubes, but unfortunately, I wasn’t able to get something like that to look good in Blender/Cycles. I tried making the coils’ emission have specific colours while encasing them in clear, colourless glass, and then later tried making all coils have the same red-hot emission and instead making the glass material tinted. Ultimately, however, I ended up scrapping that concept altogether, and decided to start over from scratch.
Base model in Blender
The second iteration was a lot closer to the final design; I had already decided to use some sort of fluid as a tribute to the first design, which had coloured goo connecting two small gadgets and is also a good way of adding a nice element of chaos and unpredictability into the mix. This time I wanted to try something a little beyond my comfort zone, so I decided to create a smoke simulation instead, though it didn’t occur to me to add a fan to the design until much later.

Without the fan as the centerpiece of the machine’s design, the earlier concepts were mostly unbalanced, centered around convoluted metal pipe designs and glass casings, which I was unsatisfied with for the most part. I also could not make up my mind up as to how the back half of the design would go. I switched back and forth between having light bulbs encased in glass like in my first iteration, but eventually settled on having a handle-like structure like in last year’s model.
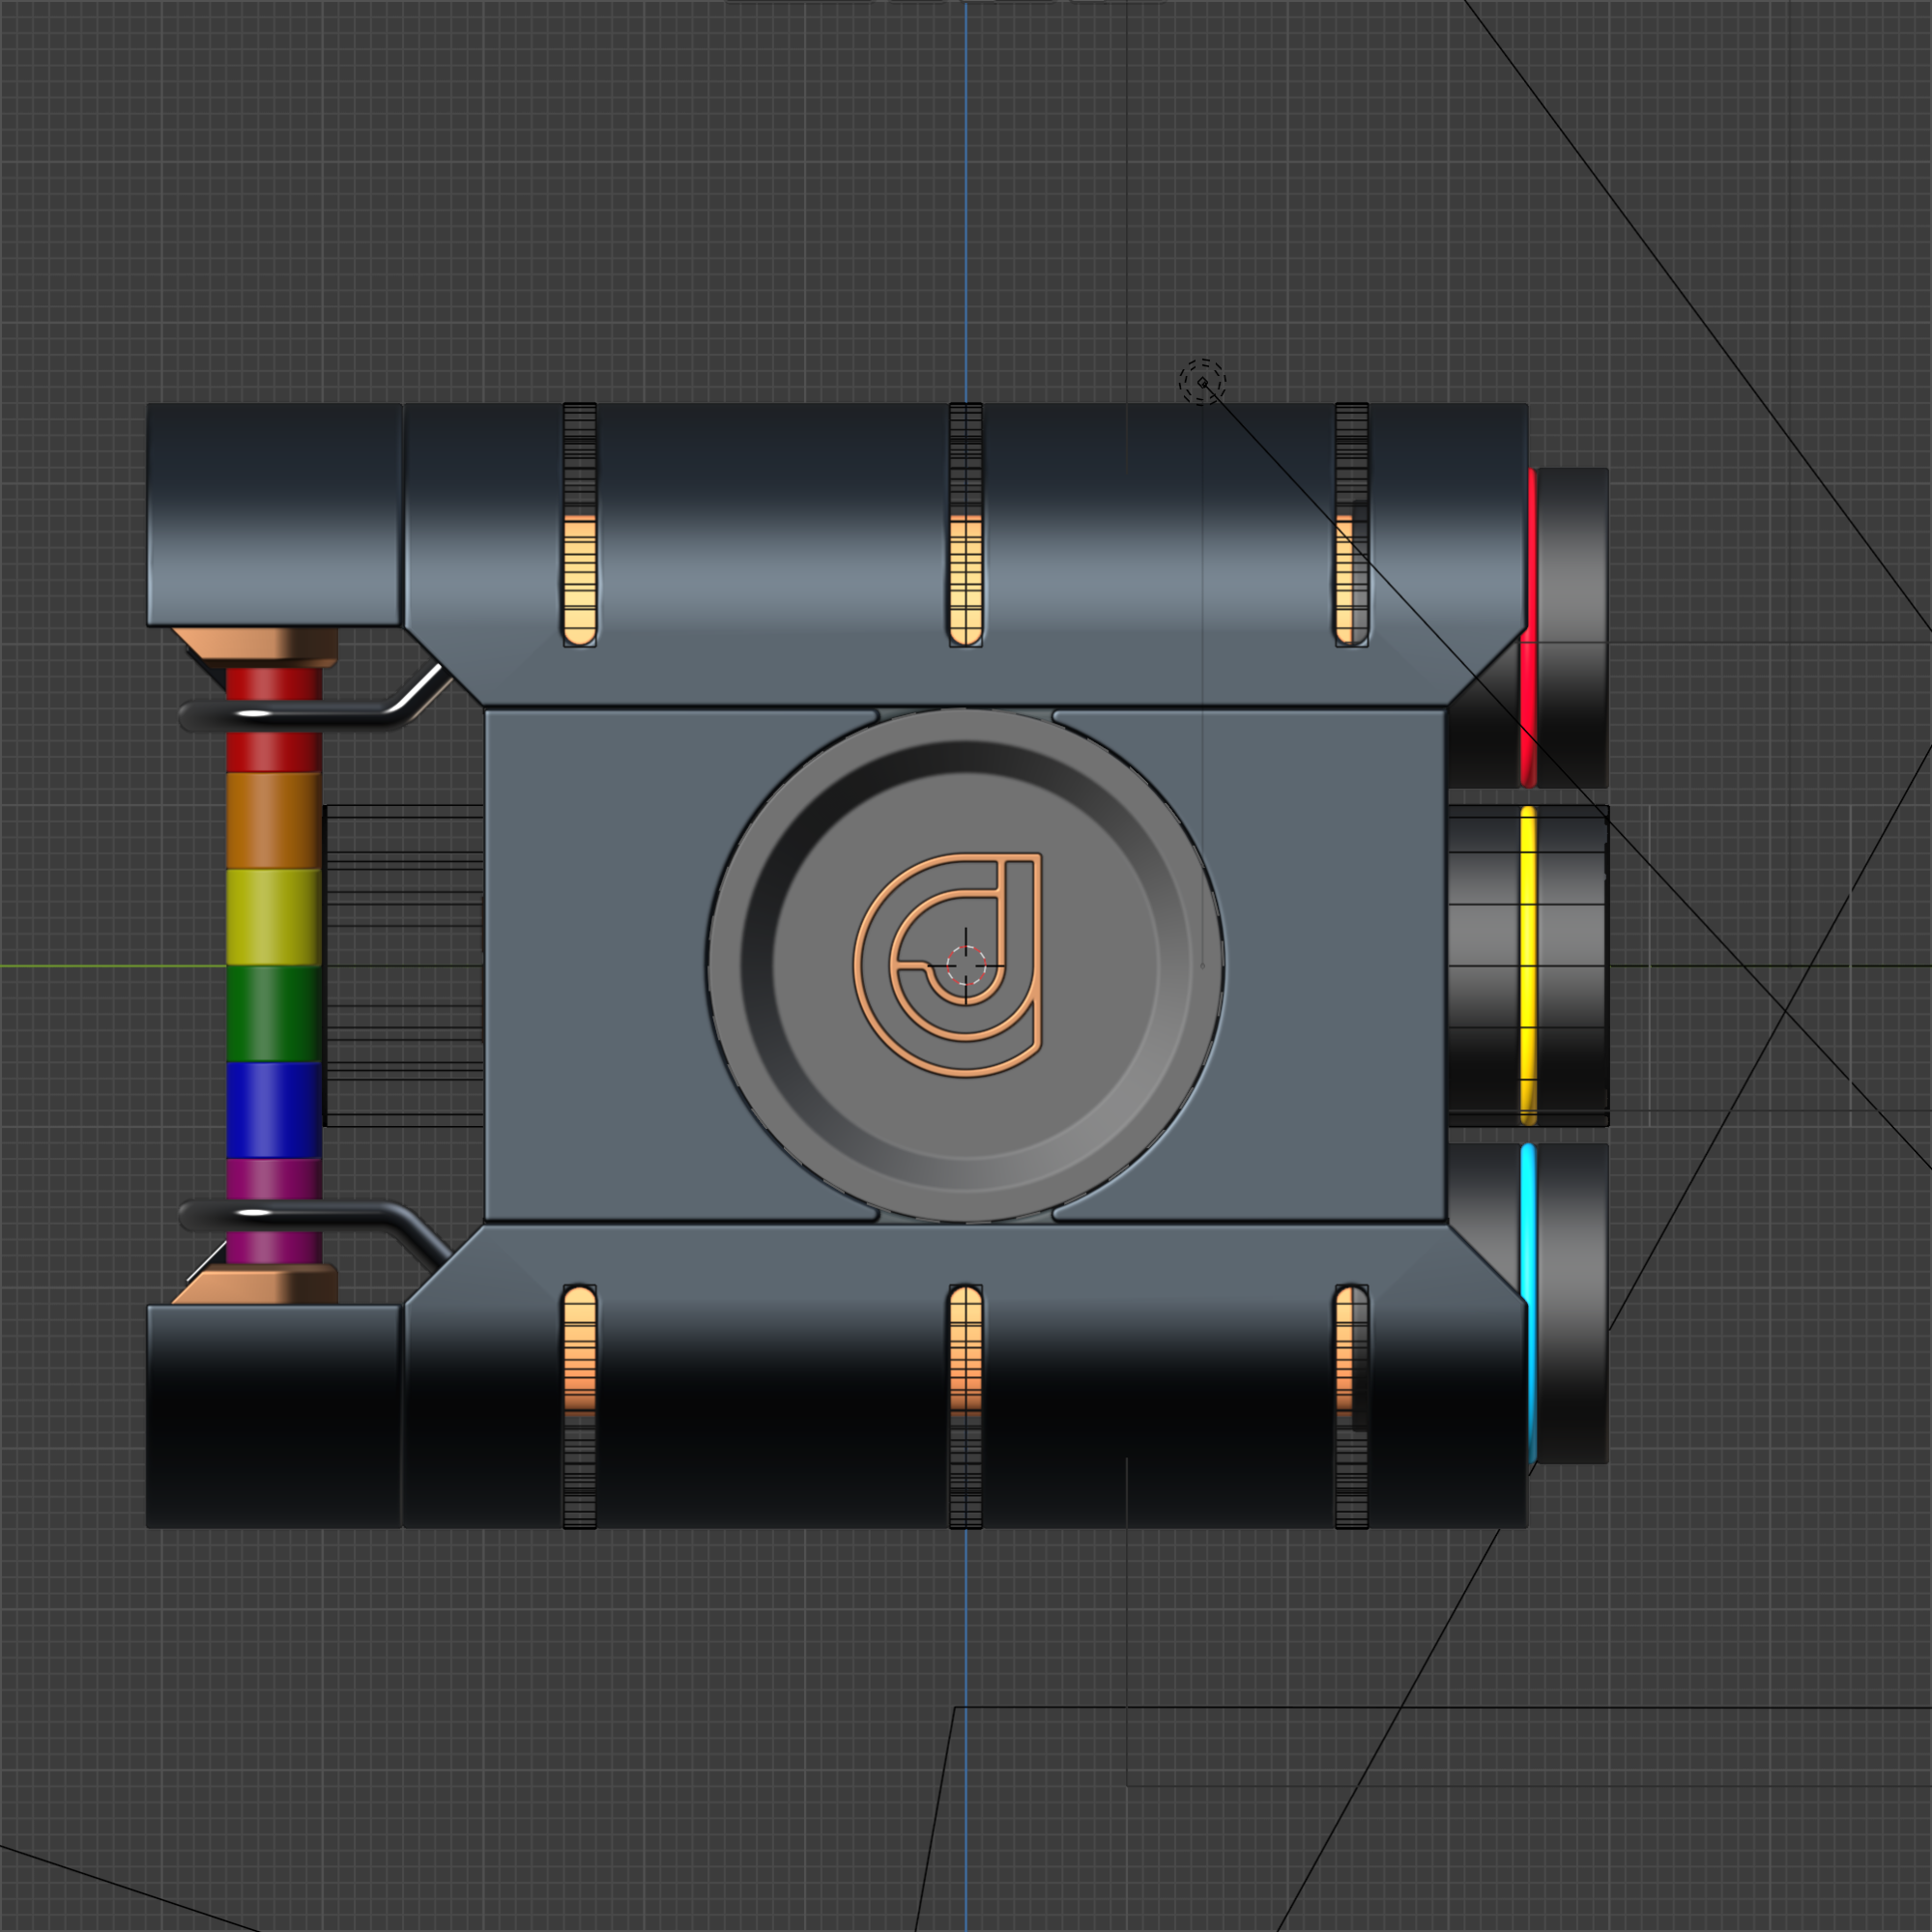
The creation process for the final version of the machine is pretty similar to that of my other designs; I used Blender with some very useful add-ons, including MasterXeon1001’s BoxCutter and HardOps, Node Wrangler, SVG Import, and Curve Tools. I began by creating the three exhaust nozzles, which I did by designing the desired profile as a single n-gon and then using a screw modifier to convert the profile into a cylindrical shape. This non-destructive workflow is very powerful because it allows me to easily modify the profile of the mesh by just adjusting one set of vertices in 2D space, which is a lot easier than working with edge loops.

It also allows me to have separate levels of detail for the viewport and for the final render, meaning I can work with a lower-res model in the viewport, and Blender will automatically switch to a higher level of detail for the final render. Finally, I added an array modifier to the model to convert the single exhaust nozzle into three evenly spaced ones (and later, switching to four and five nozzles by just changing the value in the array modifier).
For the main shell of the machine, I used a pretty straightforward modelling workflow, using tools like the spin operator, bevel, and knife tools. Once I had the shape all laid out, I proceeded by using some more non-destructive workflow elements such as a solidify modifier to turn the set of non-manifold faces I had built into a nice-looking shell with real thickness, and boolean modifiers to cut the three “vents” at the top and bottom of the shell, as well as weld and weighted normals modifiers to clean up any weird geometry.
For the handle, I used a fairly basic workflow like with the shell, but this time using the mirror modifier, instead of the solidify modifier, to convert my non-manifold geometry into a clean, symmetrical model. I also used a neat trick for the rainbow colours of the handle to avoid creating six different materials. Instead, I used an image of the colours and mapped the UVs of each piece into the area corresponding to each colour. Using a bezier curve, I then added a nice little metal pipe going around the top and bottom of the handle to add a bit of extra detail. A problem I always have when working with bezier curves is the fact that I cannot use the vertex bevel tool to make a hard corner into a nice bend like I can with mesh geometry. But, while working on this project, I discovered the Curve Tools addon, which implements this exact functionality as well as other useful tools I have yet to discover and try out. Once I had completed the top curve pipe, I again used the mirror modifier to symmetrize the model, allowing me to modify both pipes simultaneously in case I had to make any changes in the future.
Something I often like to do for my 3D models is ensuring the separate pieces of the machine fit together properly by avoiding overlapping geometry, and thinking about how the mechanism would work in real life, and adding in any missing hinges, pistons, axles, etc. This thought process made me realize that the missing piece of the puzzle for this design was a main fan to pull in air for the machine to turn into smoke. With this in mind, I punched a hole into the center of the machine and began designing a fan. I started designing a fairly traditional fan, but I scrapped it once I realized that I wanted to make a design more akin to that of laptop fans, or the fan used in the GTX 1080Ti. After a bit of research, I discovered that these types of fans are called “centrifugal fans” and, thanks to this piece of information I was able to look up more reference images and details on how they work. To make this model I once again used the magic of modifiers to speed up the process. I started with a single edge, used a spin operator to convert it into a curved surface, and used a solidify modifier to convert the non-manifold geo into a proper mesh.

Once I was happy with the profile of the blade, I used an array modifier with the “Object Offset” option to make an angular offset, essentially creating many copies of the mesh around a central axis. This is the same as using a spin operator with the “Use Duplicates” option enabled (but in the form of a modifier, which is key for achieving a non-destructive workflow). With the fan complete, I gave it a quick spin and realized this design produced a pretty strong wagon-wheel effect which I did not like at all, so in an attempt to remedy this I also added some subdivisions to the blade geometry and a very subtle displacement modifier with a cloud texture mapped to the x-axis to make each blade look slightly different from the next.
Finally, I like to include a signature/watermark in most of my designs, but instead of slapping a .png on top of the final render I enjoy trying to incorporate my personal logo as part of the design itself. Fortunately, a side effect of the hole I added for the fan was that the opposite side of the shell also had an identical circular hole, so I decided to fill the gap on the opposite side of the model by adding an insignia. I did this by importing my logo as an SVG, cleaning up the geometry, and using it in a boolean modifier applied to a simple circular cap on the opening of the backside of the model.
Cycles materials
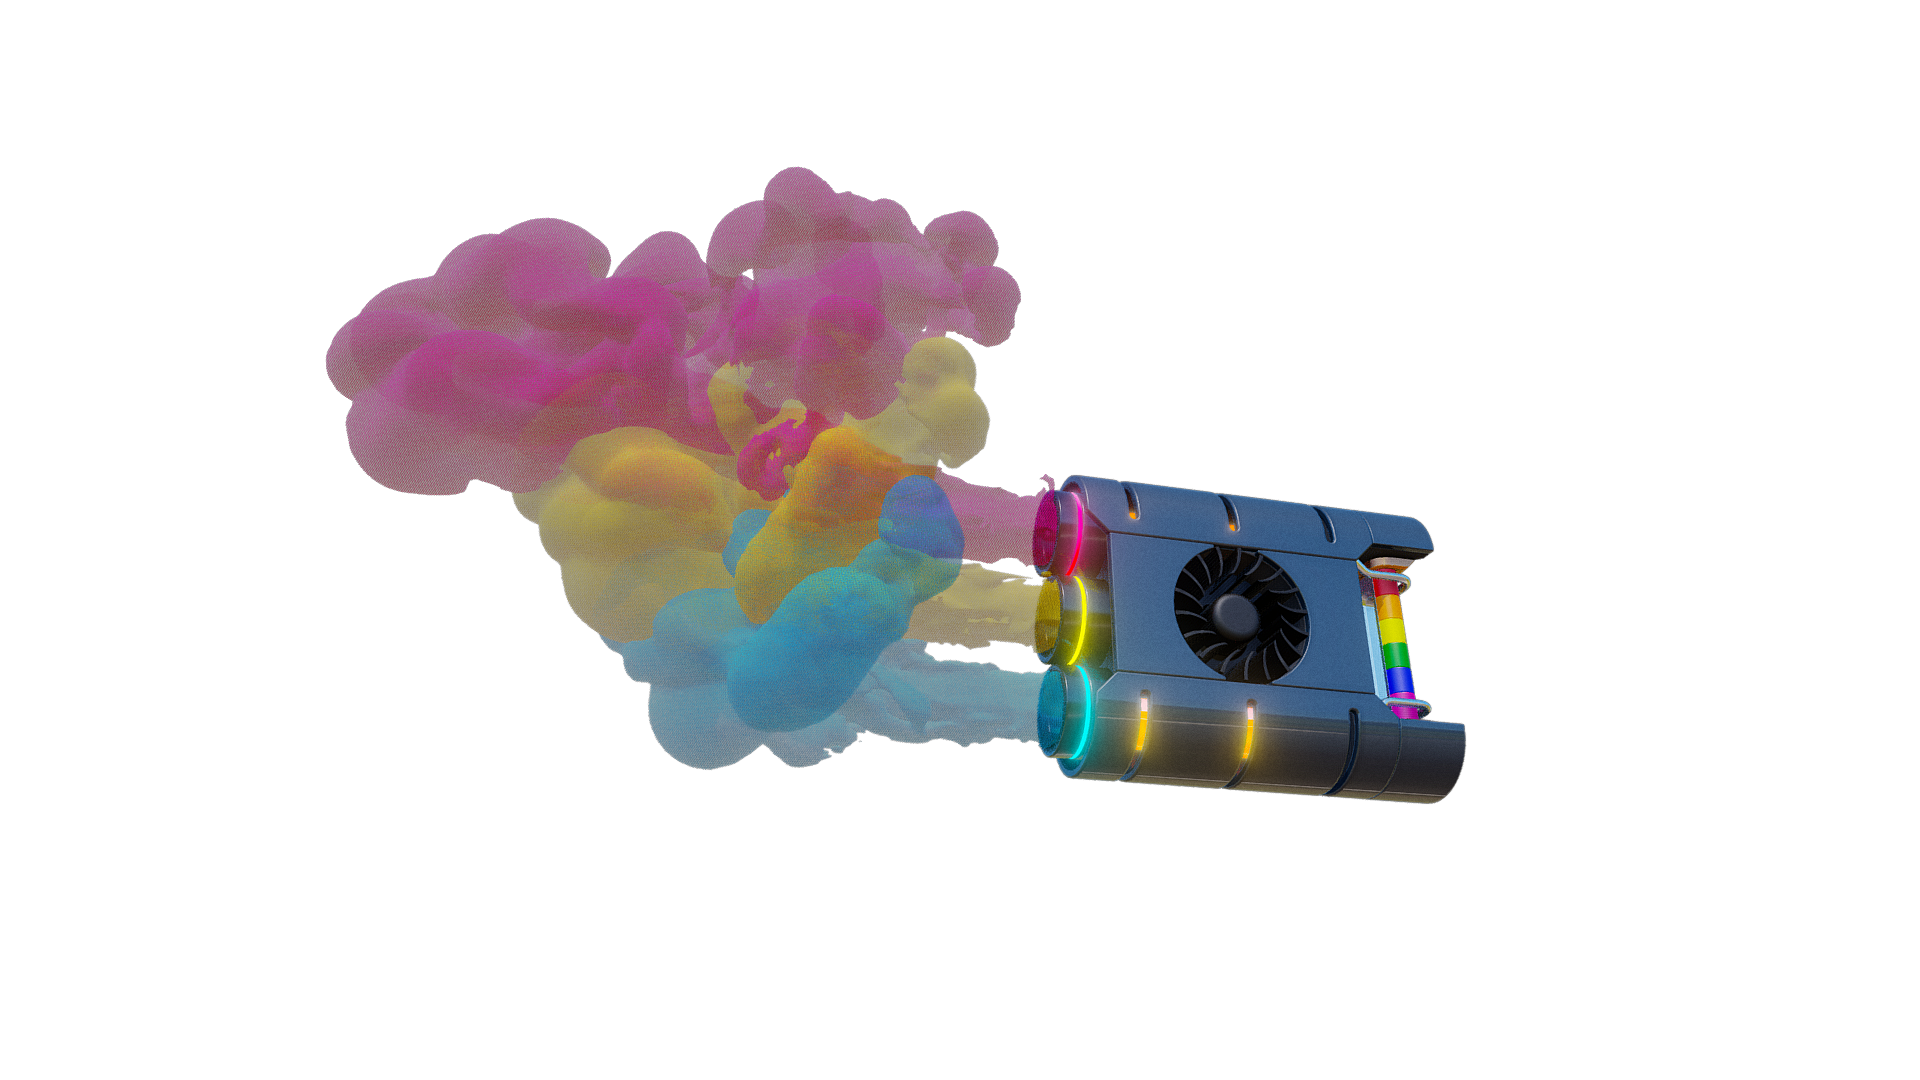
For the materials of the model I once again used a workflow that I’m fairly used to. I wanted to have a mix consisting of a steel/iron material, a bronze/copper material for a bit of colour, and a dark metallic material with a slight blue hue for the shell. I usually also include a plastic material with a bright colour to add highlights to certain details of a model, but this design would have a lot of colours in the form of the smoke, so I didn’t add any colourful materials to avoid colours possibly clashing with the smoke. While I didn’t do anything super interesting for this part of the design, I did experiment a bit by adding a clear coat layer to the main shell material. I also added a slight normal map to the dark metal of the exhaust nozzles using a musgrave noise node, though I’m not sure it’s noticeable. Lastly, I had to satiate my obsession with emissive materials by adding glowing rings to each exhaust nozzle, which I added to match the Pride flag colours corresponding to the smoke that each nozzle would produce.
Smoke simulation
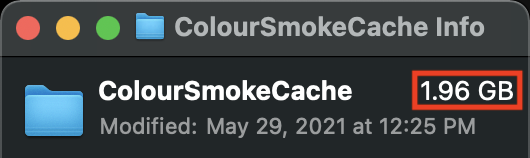
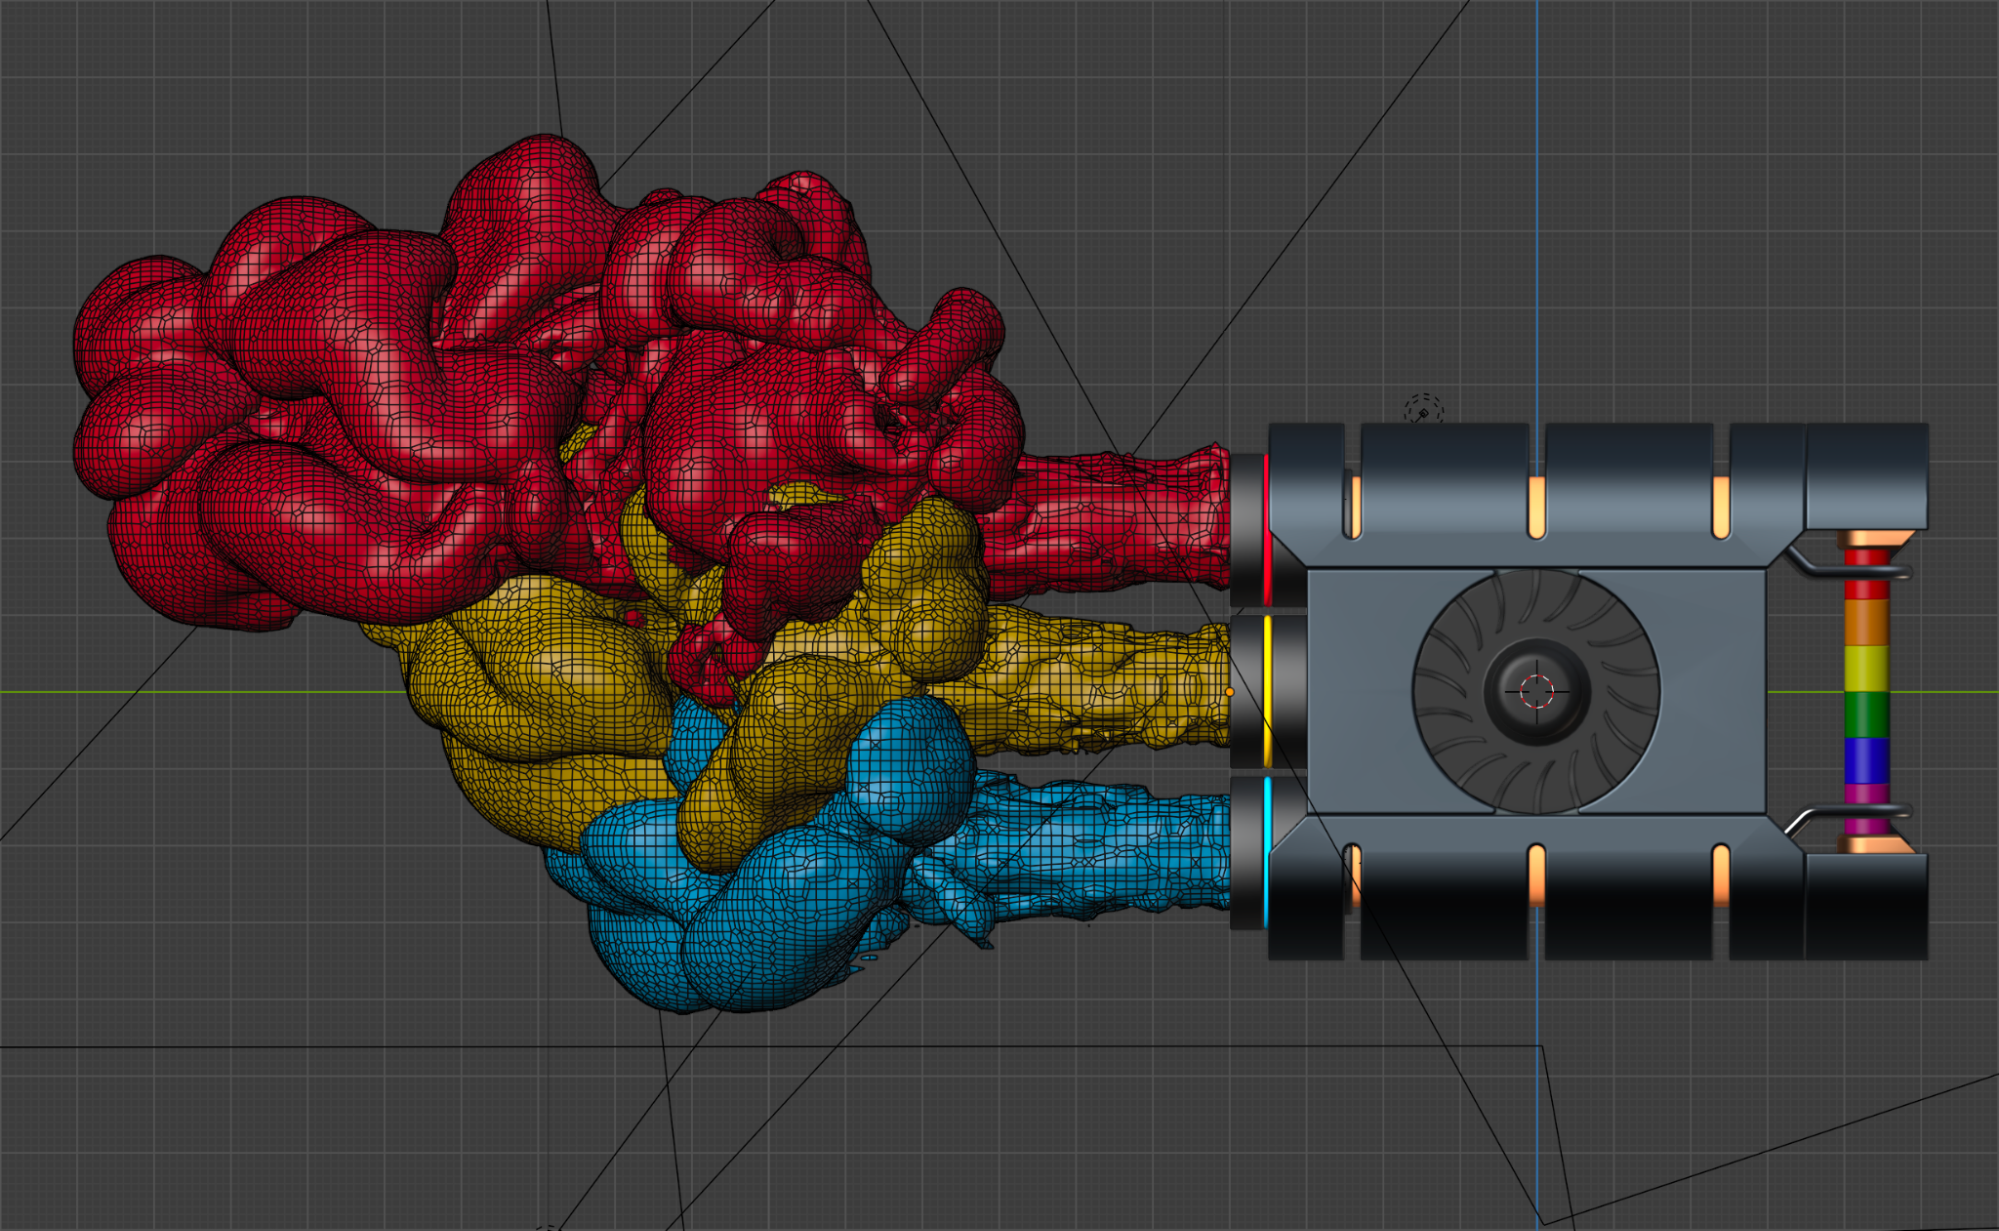
To finish up the piece, I began to work on the most complicated and painstakingly tedious part of the process: the smoke simulation. 10% adjusting some values, 90% waiting around to see the results. Since this part of the process was largely just throwing stuff at a wall and seeing what sticks, I will admit I did not have any sort of well-thought-out process, but I will try to describe what I did regardless. I knew I had to ensure the smoke wouldn’t clip through the model, so I began by making a very low-res collider for the nozzle to use as a fluid effector, and then creating a basic shape to use as the fluid flow/emitter. I selected the flow object, hit the “Quick Smoke” button to set up the smoke sim, and… nothing. For some reason, the smoke would appear inside the fluid flow but wouldn’t move. I quickly realized that for the smoke to play nice with the fluid effector, I would have to simulate the smoke at a fairly high number of resolution subdivisions (ended up going with 128). Once the smoke was able to move around freely, I began adjusting the simulation parameters; 25m/s initial velocity in the flow object so the smoke would visibly “shoot out” of the nozzle, 2.5 buoyancy density, 5.0 heat, 1.5 time scale, and, most importantly, enabling adaptive domain to speed up the simulation (something that took me an embarrassingly long amount of time to remember). Once the dynamics of the smoke were working well, I set up the cache location (remember, kids, “cache_fluid_4b85f272” is not a good name for a cache folder), and simulated the smoke domain with Type set to modular. Once the base sim was complete, I enabled noise, which adds more detail to the smoke, gives nicer swirls and a nicer overall look/texture. By the time I finished tweaking the noise values, I had come to the numbers of 2 for upres factor (though it would’ve looked a lot nicer with a higher value, but I can only ask so much of my computer), 1.0 strength, 2.0 scale, and 0.1 time.
Once I was completely satisfied with the look of the smoke sim, I had come up with a very clever idea. Instead of spending several more hours generating another 2 gigs of smoke cache for each of the remaining two nozzles, I could just import the VDB cache into Blender, and offset the playback for each nozzle, essentially using the simulation with a -10 frame playback offset for the bottom nozzle, using the original simulation for the middle nozzle, and importing the same simulation with a 15 frame playback offset for the top nozzle. This made each stream of smoke look unique when compared to the adjacent one, with minimal effort and saving me the time it would’ve taken to simulate another two smoke domains.
With the knowledge I had garnered from making the main smoke simulations, I then made a very simple and subtle smoke simulation to make vapour come out of the vents in the main machine shell. I also added some highly emissive objects to the inside of the shell to depict an intense heat emanating from within the machine.
Post-processing
Despite its development woes and occasional performance issues, I decided to use Natron since it’s a free and open-source option, it has some nice automation tools, good support for Blender’s filmic colourspace, and seems to work with .EXR files a lot better than Adobe Photoshop. After using Blender’s nodes, Unity’s ShaderGraph, and UE4’s Blueprints, working with a node-based interface is also something that encouraged me to implement Natron into my workflow (even if its nodes implementation and overall UX leaves a lot to be desired). The process I used is fairly simple; I added a glow/bloom filter, color-correct, and then tried doing something interesting for the background. First, I found a nice image from Unsplash by Ken Smith and then threw it into Natron. I applied a blur filter and colour grade node to remove detail and mute the colours so it wouldn’t distract the viewer, and then set up a transform node in such a way that each of the different variations would use adjacent sections of the image.

This little trick allowed me to achieve a nice seamless effect when scrolling between images (horizontally) on Instagram and (vertically) on ArtStation. To keep things organized, I used NameChanger to bulk-rename the sets of images from a simple numbered sequence to a set of more descriptive names. After rendering and post-processing all the stills, I finished things up by making an ArtStation post for this project where I also included all the variant pride flag renders.
Preparing and uploading to Sketchfab
At first, I was unsure of whether I would be able to upload this model to Sketchfab, seeing how a big part of the design was the smoke and VDB support is unfortunately not something that is available on Sketchfab. Fortunately, before giving up, I remembered that late last year, Blender added a new modifier to take care of this exact problem (proving once again that Blender’s modifiers are the solution to everything). Using this modifier, I was able to convert my smoke simulation into a simple mesh and on top of this the modifier has options for how much detail I want, so I was also able to avoid having to upload trillions of polygons to Sketchfab. With my smoke simulations now converted to meshes, I was then able to upload and re-upload my model to Sketchfab and then go back to Blender to fix any issues with the normals, disabled collections still showing up, etc.
Once the model was imported nicely, I began setting up the materials and lighting in Sketchfab. Once again, the majority of this process was fairly straightforward until I had to configure the smoke. I knew I would use some sort of transparent shader since there are no volumetric shader options in Sketchfab, but I wasn’t sure which would be most suitable. The main issue is that the smoke overlaps, which produces a nice effect with volumetrics, since the colours blend together, but when they’re transparent surface shaders you can see the hard edges overlapping inside the meshes.
The default blending option looked alright, but the effect produced by intersecting geometry was rather unpleasant, and the additive option was essentially identical aside from the fact that it also made the material incredibly bright. The refraction option was something I considered for a while since it could be used to depict the smoke as either a liquid, or a crystal version of the smoke, but eventually I decided I wasn’t interested in that look either.
Finally, I tried the dithered option. Normally, I wouldn’t even consider this option since it produces some intense artifacts, but these artifacts produce an effect that I think works really well with the smoke. Part of the effect produced by the artifacts is some sort of motion, which is interesting when mixed with smoke since it’s rarely ever seen completely still. From my understanding, dithering consists of rendering the object as fully opaque in some pixels, while in other pixels the object is not rendered at all. This effect essentially makes the model look like it’s made up of very many, extremely tiny, fully opaque particles, which is what volumetrics are supposed to be. The only thing I don’t like about this option is that I had to disable chromatic aberrations since it appears to create some sort of distorted screen-space moiré effect when the two are enabled, which is rather unfortunate since I love using CA when postprocessing my models.
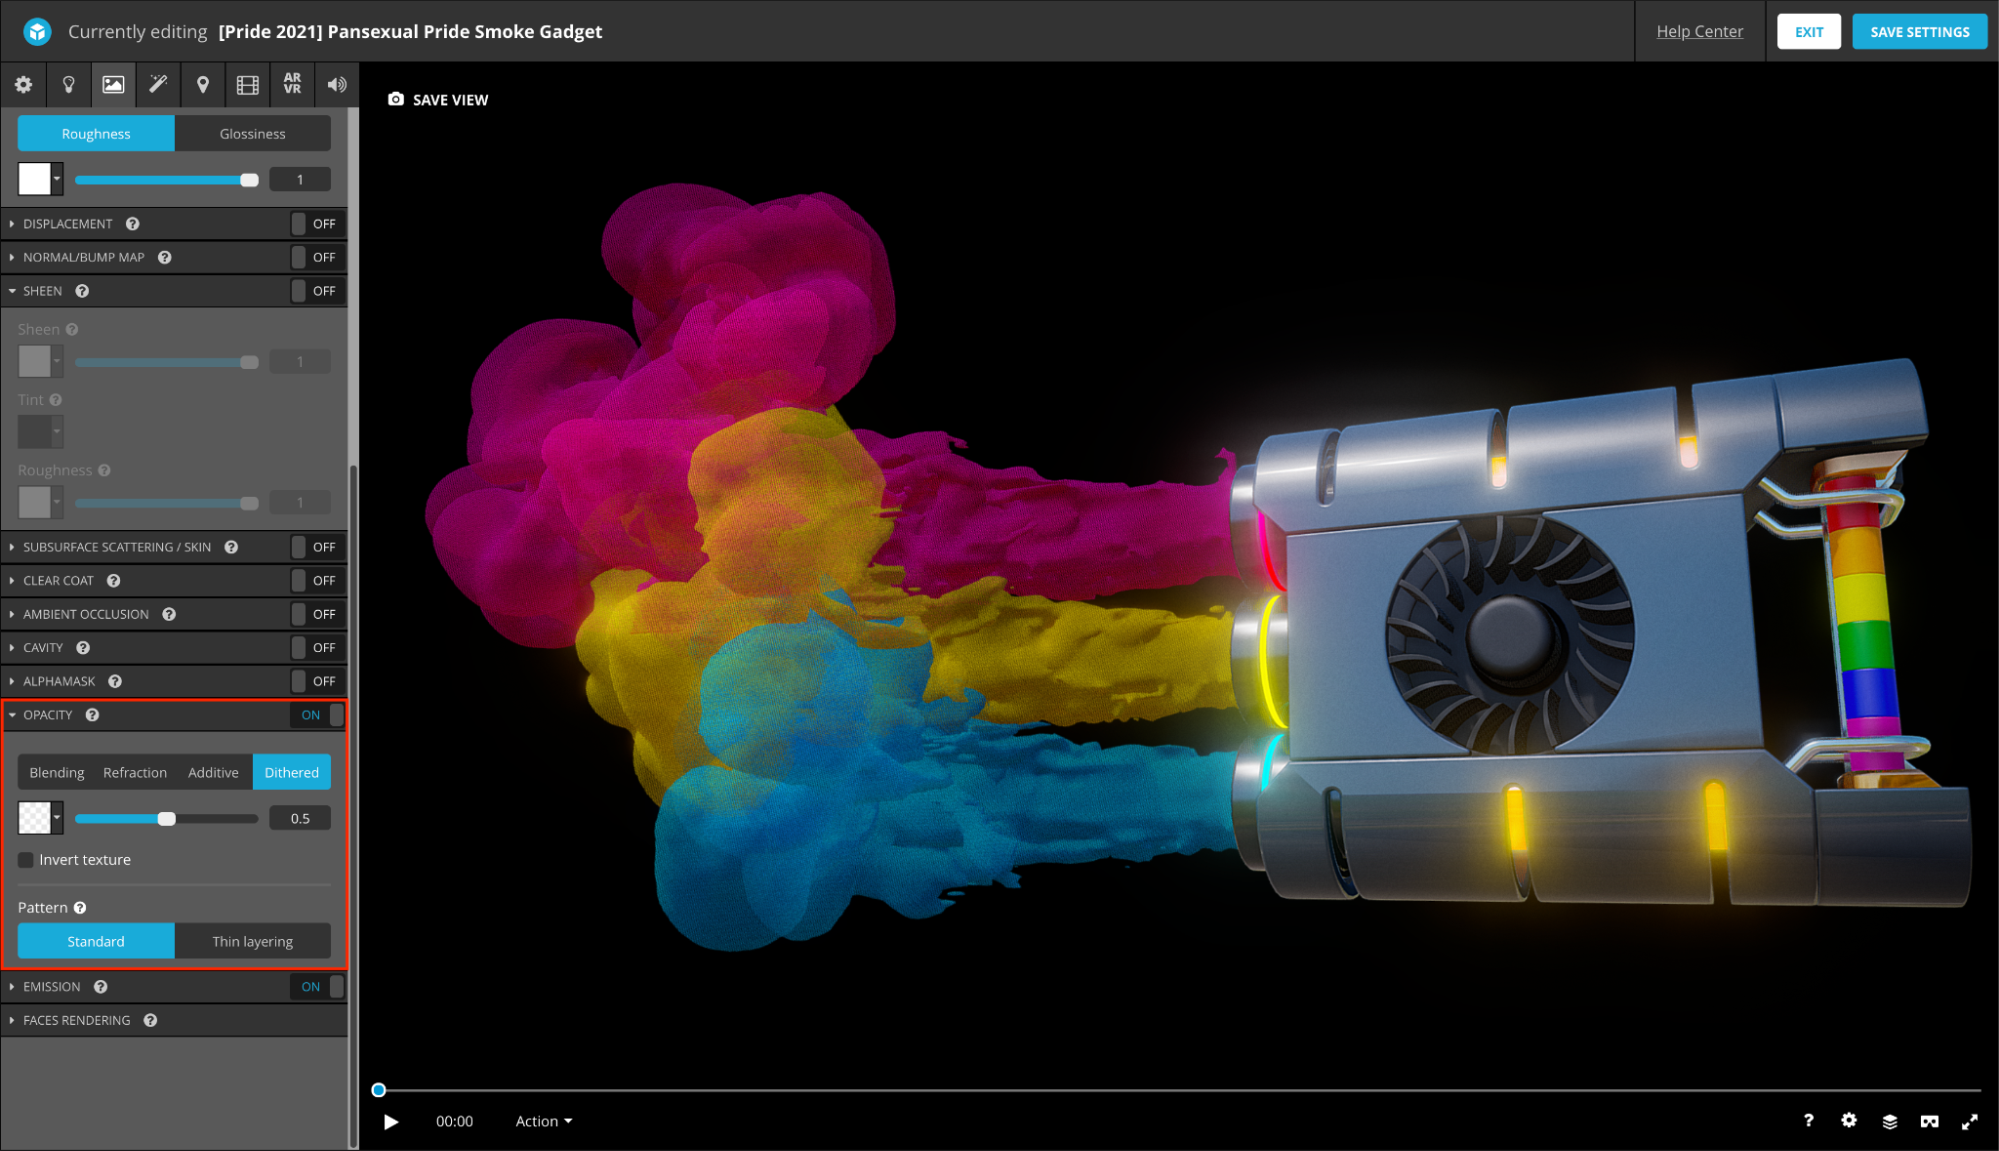
With materials set up, I moved on to setting up the post-processing filters. I went with my bread-and-butter combination of screen-space reflections, ambient occlusion, grain, sharpness, chromatic aberrations, vignette, bloom, and a touch of tone mapping. I left the configuration like this for a long time, until I wrote this piece for the Art Spotlight and decided to look into the weird effect caused by dithered transparency, which is when I discovered that it doesn’t play so nice with chromatic aberrations, so I disabled it.
Conclusion
To close up this Art Spotlight, I want to thank the Sketchfab team for giving me this opportunity to ramble on endlessly about my creative process and give me a platform to celebrate Pride month and LGBTQ+ culture. I also want to thank my friends and family for supporting my creative endeavours. I encourage any artists reading this to always try to experiment and try new things, do things outside your comfort zone, and embrace failure as a great learning opportunity. If you have any other comments or questions, or if you want to stay up-to-date on what I’m up to, I can be found on Twitter, Instagram, ArtStation, Itch.io, and of course, Sketchfab.
About the author
Juan Callejas
Colombian 3D artist and game developer living in Canada, Digital Media student at York University.